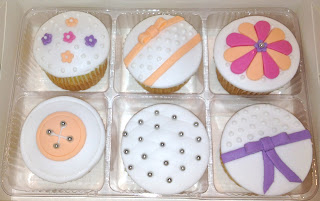
The course was only $69 for 2hrs where you learn the basic techniques of decorating cupcakes. We arrived to have a little workstation each with all tools in front of us to decorate 6 pre-made vanilla butter-cake cupcakes. I was a little concerned that I wouldn't get my monies worth since I have been baking for a few years now, & teaching myself the decorating side of things (youtube.com is my friend in these circumstances) but I was very pleased with the knowledge gained from such a short course.
Here are a few pics I took as I went through each step...
Step One: Make a 'well'.
Greatest tip I could have learnt from this course was to cut out a well around the outside of your cupcakes. This allows you to add more ganache while also being able to keep a fairly flat surface for later on when you go to decorate with fondant.
Step Two: Ganache.
No need to be super neat with this application so long as you don't get the ganache on the outside of the paper patty. If you want a flat surface later on, then keep the quantity added to a minimum, however if you want a little mound the pile it up :-)
Step Three: Hot Knifing.
Grab a mug of hot water & a palate knife. This is more about getting the knife hot instead of the water, so make sure you tap off excess water before you start 'hot-knifing' your cupcakes. I went for a flat smooth surface. Not a surprise seen as my hubby tells me... I'm a little OCD.
Step Four: Fondant Layer.
Roll out some fondant icing. If you love the taste of this stuff then go ahead & roll it as thick as you would like to eat it. I am not a fan of the taste, so I like to roll it quite thin usually. Cut out the circles using a circle cutter that is slightly bigger than the cupcake top. Apply some sugar syrup (apricot jam mixed with boiling water & sieved) to your cupcake, then place the fondant on top & smooth down.
Just divine!!!
A pic of the three decorators with our stunning cupcakes :-)
R to L: My mum Liz, my sister Karleah & Me!!
When we got home we couldn't wait to put them in a little tower
& show them off to our family.
If you've attended a cupcake course & have any extra tips that you would like to share, I would love to read them. Please post below.
xoxo T


The cupcakes look amazing! What a fun day with the girls :-) I'm doing an Italian cooking class with Mum and Leanna in a couple of weeks, looking forward to it!
ReplyDeleteThanks Kelly! You will have such a great time with your mum & sister at the Italian Cooking Class. Even if the course isn't the greatest, it's just such a nice way to spend time together doing something a little different. I can't wait to hear how iut goes & what you learn!! xoxo T
DeleteI have been planning to do this course with whimsical! Hopefully the cheap vouchers come up again :)
ReplyDeleteBel I've seen the deals a few times since I purchased mine so I'm sure if you keep an eye out, you will be able to snap some up too! Would love to hear if you end up going & your thoughts of the course also.
Delete